|
|
|
Install COMPAS to new laptop and restore COMPAS backup from old system. COMPAS backup and restore utility is available @ https://extranet.w3.siemens.com/us/DistributorResourceCenter/compas/Pages/COMPAS.aspx
-
Path:C:\Users\USERID\AppData\Local\COMPAS\Production\USERID\Job\ This path is provided for a manual approach to backing up and restoring COMPAS Quotes and Orders residing on your computer. It has been found the following process may not work on newer Windows machines.
Before COMPAS users start the process to install COMPAS on a new computer you will need to back up all of your COMPAS files on your existing computer.
Backup: COMPAS Data.
Step 1: Backup COMPAS data to the network shared drive or flash (jump) drive. Follow the following COMPAS Backup steps.
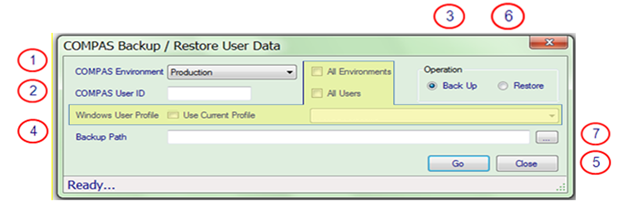
Figure: COMPAS Backup/Restore utility user interface
a) Copy the attached utility (BackUpCOMPASData.zip) to desktop, open and run the same.
b) Select Environment (Default is Production) as displayed in figure above (1) for which you are taking data backup.
c) Confirm/change COMPAS user ID for which data backup is performed as displayed in figure above (2).
d) Select Operation as Backup as displayed in figure above (3).
e) Select backup location using button as displayed in figure above (7) using folder location browse option.
f) Click button Go as displayed in figure above (5).
COMPAS: Application Installation and Data Restore.
Step 2: Installation of COMPAS application.
a) Click URL https://www.compas.siemens-info.com/MimesProd/CVC/Application/Compas_Application_Installer.exe to start download of COMPAS application installer.
b) Save the installer at desktop location in your system.
c) Right click on downloaded file (COMPAS installer MSI) and “Run as Administrator” (for Windows 7) and follow the installation instructions. Refer attachment (Welcome – COMPAS Installation Instructions.pdf) for details.
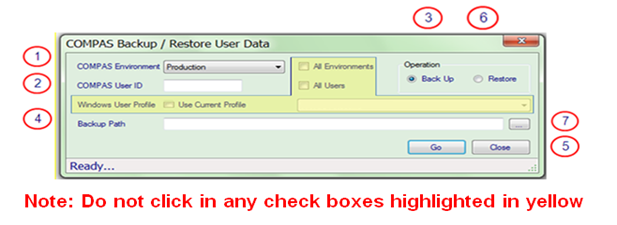
Figure: COMPAS Backup/Restore utility user interface
Step 3: COMPAS application data restore
a) Copy attached utility (BackUpCOMPASData.zip) to desktop and run the same.
b) Select Environment (Default is Production) as displayed in figure above (1) for which you are restoring data from backup.
c) Confirm/change COMPAS user ID for which data restore is performed as displayed in figure above (2).
d) Select Operation Restore as displayed in figure above (6).
e) Select backup data location using button as displayed in figure above (7) using folder location browse option (hard drive location or flash drive location).
f) Click button Go as displayed in figure above (5).
g) If you have any technical issues, you can use one of the following support options:
- Chat with COMPAS support by using the support feature within the COMPAS Help menu, COMPAS Launch Pad, click on Support to start a web chat or click on the Black wrench on your desktop to start a web chat.
- Message Center: Call 866-636-4065 (COMPAS Help Desk. Leave a message and we will call back!
- Calling the Siemens help desk number 877-234-1122 will delay our response.
h) NOTE: using the original Backup and Restore after initial computer set up will populate COMPAS with only the saved data and any new data added after the original Backup and Restore will be overwritten.
.png)

